Introduction to PlantUML
PlantUML is an open-source tool that enables users to create UML diagrams using plain text descriptions. This approach allows for the rapid and straightforward creation of various diagram types, making it a versatile tool for developers and other professionals. 1
One of the key benefits of PlantUML is its ability to simplify the diagram creation process. By using a simple and intuitive language, users can quickly draft diagrams, which helps in visualizing and documenting complex software systems more efficiently. 2
PlantUML is widely used in software engineering for creating a variety of diagrams, including flowcharts, sequence diagrams, class diagrams, and more. Its flexibility and ease of use make it a popular choice for developers looking to document and communicate their software architecture. 3
Integration with various tools and IDEs, such as Visual Studio Code, further enhances the utility of PlantUML. This integration allows users to leverage the capabilities of PlantUML within their preferred development environments, streamlining the workflow and improving productivity. 4
PlantUML supports the concept of ‘diagram as code,’ which allows for easy version control and collaboration. By using text files to define diagrams, multiple team members can work on the same diagram simultaneously, making changes that are instantly visible to everyone. 2
blog.jetbrains.com
connect2grp.medium.com
Installing PlantUML Extension
To begin, open Visual Studio Code and navigate to the Extensions sidebar. You can do this by clicking on the Extensions icon located on the left-hand sidebar or by pressing Ctrl+Shift+X on your keyboard. This will open the Extensions Marketplace where you can search for various extensions to enhance your coding experience. 4
In the Extensions Marketplace, type ‘PlantUML’ into the search bar. This will bring up the PlantUML extension among other related extensions. The PlantUML extension is specifically designed to help you create UML diagrams directly within Visual Studio Code using a simple and intuitive syntax. 4
Once you have located the PlantUML extension, click on the ‘Install’ button. This will add the extension to your Visual Studio Code environment, enabling you to start creating and previewing UML diagrams. The installation process is straightforward and should only take a few moments. 4
Before you can use PlantUML, ensure that Java is installed on your machine. PlantUML relies on Java to function properly. You can check if Java is installed by running the command java -version in your terminal. If Java is not installed, download and install it from the official Java website or through a package manager. 5
For certain types of diagrams, PlantUML also requires GraphViz. GraphViz is a graph visualization software that helps in rendering complex diagrams. You can download and install GraphViz from its official website. For macOS users, GraphViz can be easily installed using Homebrew with the command brew install graphviz. 6

www.rushis.com
Setting Up PlantUML
After installing the PlantUML extension, the next step is to configure it properly. This involves setting the path to the PlantUML jar file and GraphViz, which are essential for rendering diagrams locally. Ensuring these paths are correctly set will enable the extension to function seamlessly. 4
To configure these settings, open the ‘Preference Settings (JSON)’ in VSCode. Here, you can add necessary configurations such as ‘plantuml.jar’ to specify the path to the PlantUML jar file and ‘GRAPHVIZ_DOT’ to point to the GraphViz executable. These settings ensure that the extension knows where to find the required files. 7
Additionally, it is crucial to add JAVA_HOME to your system or environment variables. This variable should point to the Java installation path, allowing PlantUML to utilize Java for its operations. Without this, the extension may not function correctly. 8
For easier access, you can optionally add the PlantUML jar path to your system or environment variables. This step simplifies the process of running PlantUML from any location on your system, making it more convenient to use. 7
To better organize your files, you can customize settings like ‘plantuml.diagramsRoot’ and ‘plantuml.exportOutDir’. These settings allow you to define specific directories for your PlantUML source files and export outputs, respectively, helping maintain a clean and organized project structure. 4
Creating UML Diagrams
To begin creating a PlantUML diagram, start by creating a new file with extensions such as .puml, .plantuml, or .pu. These extensions are recognized by various PlantUML tools and editors, ensuring proper syntax highlighting and functionality. 9
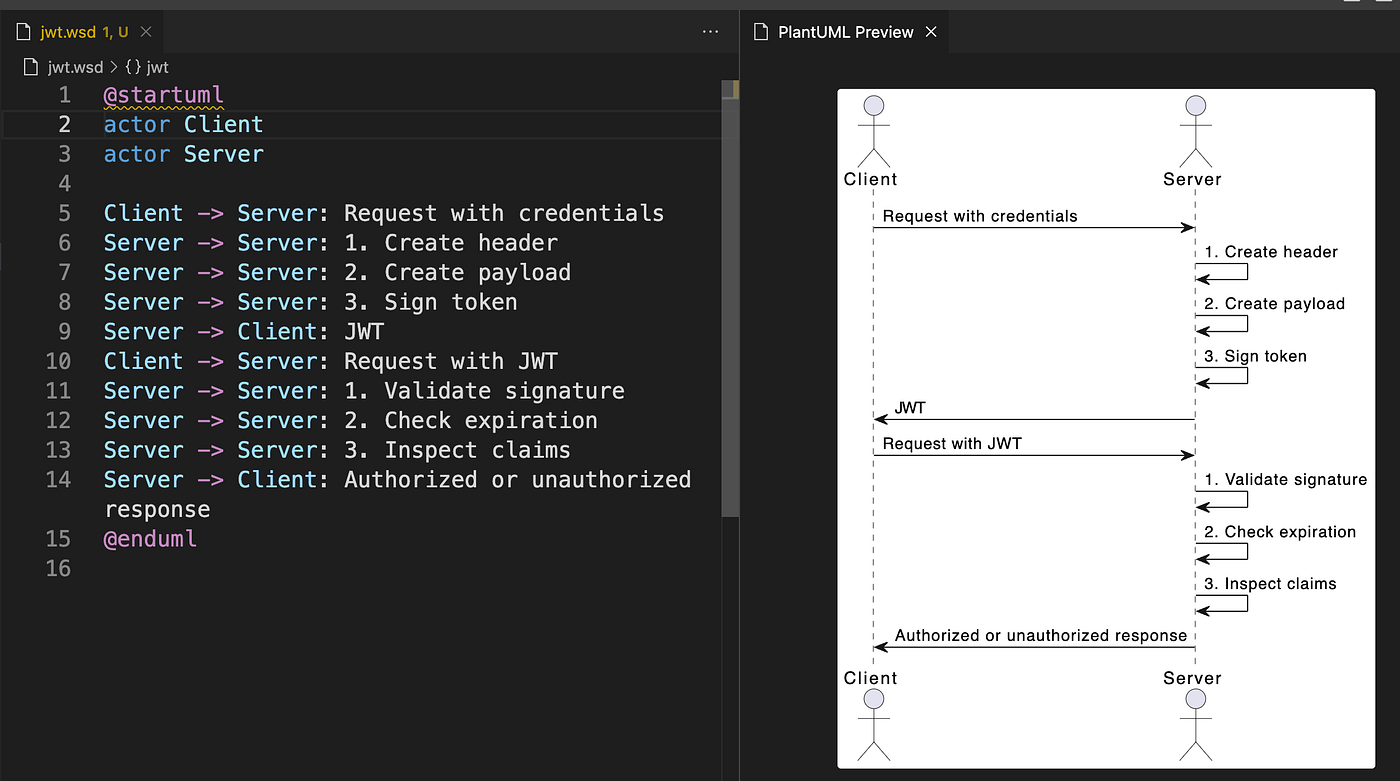
The basic syntax for a PlantUML diagram involves starting with the @startuml directive and ending with the @enduml directive. This structure encapsulates the diagram’s content, ensuring that the PlantUML processor correctly interprets the diagram’s boundaries. 9
Within the @startuml and @enduml tags, you can define various elements using keywords such as class, interface, and entity. Relationships between these elements are depicted using arrows, which can be customized to represent different types of associations. 9
For instance, a simple class diagram can be created using the following syntax: ‘class User { +String name +String email +getPassword(): String }’. This defines a class named User with attributes name and email, and a method getPassword. 9
PlantUML also supports advanced features such as including external files, using the skinparam directive for styling, and adding notes for additional context. These features enhance the readability and maintainability of complex diagrams. 9
www.drawio.com
Previewing Diagrams
To quickly preview your PlantUML diagrams, you can use the shortcut keys Alt+D on Windows or Option+D on Mac. This allows you to instantly see the visual representation of your code without navigating through multiple menus. 10
Alternatively, you can access the preview feature through the VS Code Command Palette. Simply press Ctrl+Shift+P to open the command palette, then type ‘PlantUML: Preview Current Diagram’ and select it from the list. This method provides a convenient way to preview diagrams if you prefer using the command palette. 7
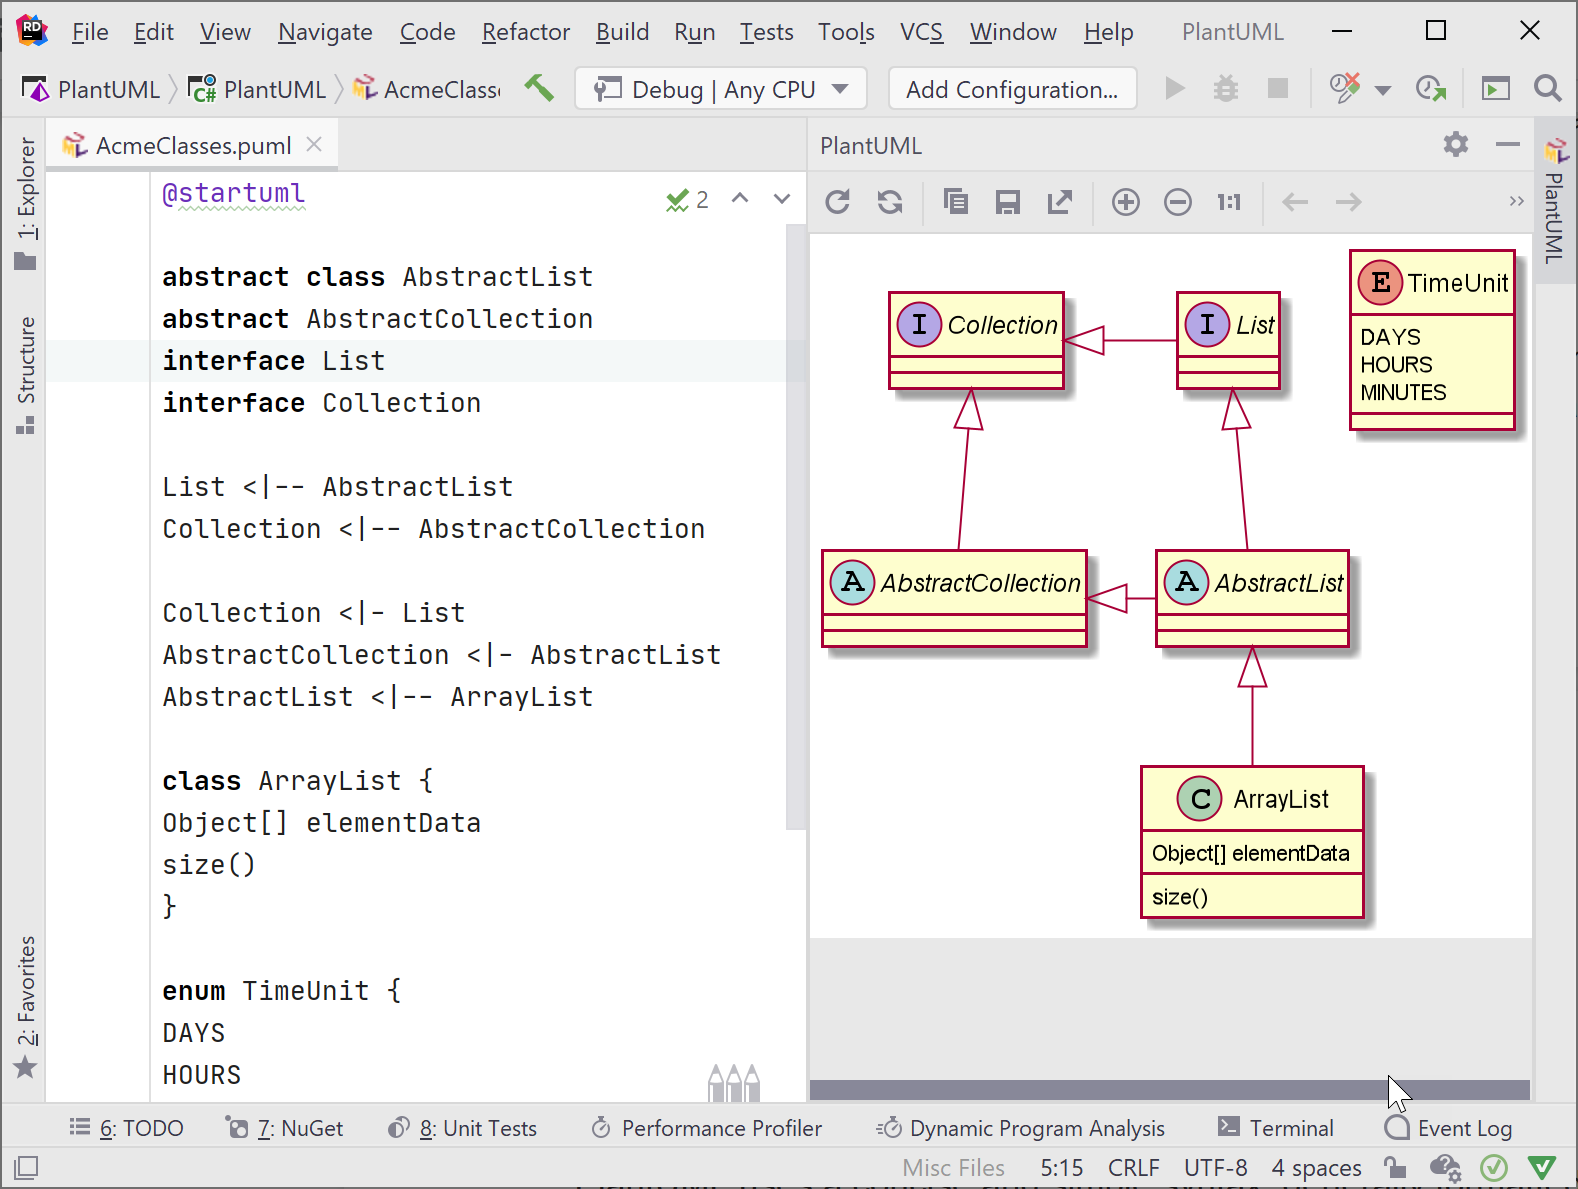
One of the standout features of the PlantUML extension is its auto-update capability. As you make changes to your PlantUML code, the preview window updates automatically, ensuring that you always have the most current version of your diagram displayed. This feature enhances productivity by eliminating the need for manual refreshes. 4
The preview window in PlantUML supports zoom and pan operations, allowing you to navigate through complex diagrams with ease. You can zoom in and out using various methods, such as mouse scroll or pinch gestures on a touchpad, and pan across the diagram by dragging with the right mouse button or using two-finger movements on a touchpad. 4
PlantUML also supports multi-page diagrams, which can be seamlessly previewed within the extension. This feature is particularly useful for large diagrams that span multiple pages, as it allows you to view and navigate through each page without any interruptions, ensuring a smooth and efficient workflow. 4

stackoverflow.com
Exporting Diagrams
PlantUML offers a variety of export options, allowing users to save their diagrams in multiple formats such as PNG, SVG, and PDF. This flexibility ensures that diagrams can be easily shared and integrated into different types of documents and presentations. 11
To export a diagram using the command palette in Visual Studio Code, simply select ‘PlantUML: Export Current Diagram’. This command provides a quick and convenient way to generate the desired output format directly from the editor. 7
For better organization of exported files, you can configure the ‘plantuml.exportOutDir’ setting in Visual Studio Code. This allows you to specify a dedicated output directory, ensuring that all exported diagrams are stored in a consistent and easily accessible location. 4
Using the command line, you can export diagrams by running ‘java -jar plantuml.jar diagram.puml -o output -tpdf’. This method is particularly useful for batch processing multiple files or integrating PlantUML into automated workflows. 11
Customization options in PlantUML allow you to adjust settings such as ‘plantuml.limitSize’ for generating larger diagrams and ‘plantuml.config’ for applying custom configurations. These settings provide greater control over the output, ensuring that the diagrams meet specific requirements. 7

www.umlboard.com

www.umlboard.com

www.umlboard.com
Troubleshooting Common Issues
To resolve preview issues, ensure that both Java and GraphViz are correctly installed and configured. Java is essential for running PlantUML, while GraphViz is required for diagram positioning. Restarting VSCode after installation can often resolve preview problems. 4
If you encounter the ‘No valid diagram found here!’ error, ensure your cursor is placed within the @startuml and @enduml block when attempting to preview. This placement is crucial for the extension to recognize and render the diagram correctly. 10
When using a PlantUML server, verify that it supports POST requests to handle large diagrams. The official PlantUML server defaults to GET requests, which may result in ‘414 URI Too Long’ errors. Setting up your own server with POST support is recommended for better performance. 4
Syntax errors in your PlantUML code can prevent diagrams from rendering. Ensure your code is free of errors and follows the correct syntax. Common issues include missing or misplaced elements within the diagram code. 12
Keeping the PlantUML extension and related tools up to date is crucial for avoiding compatibility issues. Regular updates ensure that you benefit from the latest features and bug fixes, maintaining smooth operation within VSCode. 13
